Monday, December 27, 2021

(Still) In The Diesel Shop - Continued

 The crew down at the shop must've been on strike for the last six months as they made no progress on modifying the frame to accommodate the new trucks until today -- must be trying to clear their backlog before the end of the year.

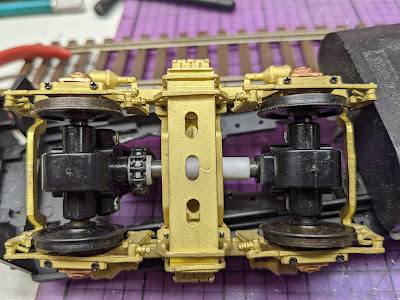
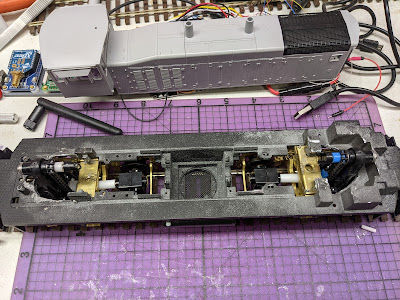
Short update here with the trucks now oriented the correct way with clearance in the frame for the drive towers.


Some close ups ... Don't mind the aluminum dust:


Also, the suspected problem of the new P:48 wheelset axles mentioned in the last posting turned out to be true.   As delivered, the replacements measured 1.798in (vs the original 5' gauge ones at 1.8165in) and in keeping with the P:48 specs, they should've been around 1.655in.

A makeshift jig using a mini-drill press and a mini desk vise was enough to get the axles shortened down to around 1.62in to 1.64in and we're back in business with squarely aligned trucks.

One step closer to getting this thing running!  Next up is fabricating some motor mounts and securing -- I'm thinking glue -- the universal joints to the motor shafts.


Sunday, July 25, 2021

(Still) In The Diesel Shop

Just over halfway into 2021 and, as usual, not as much model work as desired was accomplished for all the usual life reasons.  Nevertheless, the diesel shop crew did find some time to make progress on rebuilding the MP15DC.

I decided to re-truck and re-motor it, the latter with Faulhaber gearhead motors.  The goal is to provide super slow-speed control and remain extremely efficient with as little draw on the battery as possible.

As of July, the new trucks are re-gauged to P:48 and are installed -- albeit currently backwards.  One can clearly see the difference in wheel profile from the original P&D Hobby Truck Kit and the replacements for P:48 from Right-O-Way.


The brass truck kits are nice, but are mechanically very delicate with working leaf and bearing springs that make assembly a good challenge.   More work is needed to accommodate what seems to be longer axle endpoints on the Right-O-Way wheelsets to ensure reliable operation.

Adapting the underframe for mounting of the new trucks was the next item to tackle.   The original high mounting plates for the Atlas gearboxes were removed and new ones fashioned out of 0.064 brass bar stock with a second layer as a spacer off the underframe.   This resulted in a scale deck height off the rail of 66" -- real close to the prototype's 64 1/2".   Minor adjustments may be made later when the pilots are updated and new coupler boxes installed.

The trucks are currently installed backwards during the bolster rebuild phase shown here as more frame milling is needed to allow for the gear tower to swing and then they'll get turned around to the correct orientation. 


Following that, the motors will likely be installed on new custom-mounts extending up from the outside edges of the fuel tank area so that the motors mount above the inside axles of the trucks.  This will leave the center largely free to accommodate the battery and electronics.

I'm also contemplating a neat feature to add a battery charging plug where the fuel filler would go to avoid having to remove the battery each time.  Look for that update when it moves over to the electrical shop for final outfitting.

Monday, December 21, 2020

In the Diesel Shop

 What a year 2020 has been!   Despite, or maybe because of, being home more, very little, if any, railroad modeling took place.

Some key things came together this year and I was able to start on a key project underpinning many of the aspects of the design I've had in mind for a while now.

First up, Blue Ridge Engineering developed and released electronics that enable direct xBee interaction with Iowa Scaled Engineering's ProtoThrottle, so no separate DCC system is needed.  DeadRailInstalls makes battery power kits to provide power for the whole shebang.

The entire setup then looks like this:

(image courtesy of BlueRidge Engineering)

In my world, the electronics then all go inside the cavernous body of a mid-naughts-era Atlas MP15DC:

(mine's currently undecorated, but will look like a grimy version of this)

Currently, it's disassembled and I'm waiting on parts and track from Right-O-Way to re-gauge it to Proto:48 standards.

To be determined is selection of a decoder -- I'm thinking LokSound V5, mainly because of their standalone programmer that will keep me DCC-system free -- and sound components that fit in the fuel tank.

I might also remotor it as well depending on the amp draw and / or noise of the Atlas motor; we'll see as the project comes together.

Saturday, February 22, 2020

The Plan -- Version #1

Dear -- all two -- Readers!     A wave of inspiration came over me and after a couple hours with 3rdPlanIt, I present to the world Version 1 of an O-scale plan that fits in (a future state of) my basement.

Long term, the edges of the whole basement will accommodate the southern 2/3rds of the line with almost no compression.   I have room for a run of about 70 ft which equates to ~3400 real ft and this covers from the southern tip of the line up north to 31st on the south side of Schutte Lumber.

The first phase shown below covers the southern most ~1700ft with just a touch of compression to represent from the southern tip up just past the south-facing switch for Safeway Bakery.   A temporary shelf containing an eight-foot run-around and a spare track for storage fills the remainder of the south wall.

All-in-all, it's a pretty faithful representation of the Hill Track, though I've yet to work out all of the grades as this level of detailed editing takes much longer in 3rdPlanIt.   Preliminary work indicates that I'll be able to reasonably replicate the signature east-west elevation change of 34th St and the requisite north-south railroad grades in between and level out for the spots.

The unique nature of the spread between Roanoke Rd (front edge, left side) and Terrace St (upper right side) meant that the whole works was pulled away from the wall and a duckunder included under Fred Wolferman's driveway.  Duckunders aren't great, but since I was already planning to have the base elevation up close to (my) eye-level, it shouldn't require much ducking.  A two-plus-ish foot aisle along the right (west) wall allows one to access the spots along Terrace St as well as view the scene from a different vantage point, so no backdrop.

Anyway, here's the plan (click on it for a larger version):

Monday, February 3, 2020

Roster Update

Added a page to the blog with the full roster of equipment.  It needs some formatting work to be more presentable, but it'll do for now.   Click in the top bar to find it or visit: https://kcspur.blogspot.com/p/roster.html

Tuesday, January 28, 2020

LD SIG

Just (re-) joined the LDSIG and looking forward to upcoming articles, especially those focused on specific prototype recreations.

http://www.ldsig.org/

Saturday, October 26, 2019

O Scale Shoutout

Who knows if anyone reads this thing, but I'll do my part in this small corner of the internet to promote some additional 2 rail O scale resources.


I've found good articles and other reference information via all of these resources at some point in the recent past and continue to follow them myself, so I recommend that you check them out as well.

Wednesday, February 6, 2019

Long time no...gee, anything

Whew!  Nearly two years since a post on this blog.   2019 might see more opportunities to dabble in model trains again now that kids are more self-sufficient and home remodeling has quieted down.

Anyway, I return today with a product announcement of sorts and a (soon-to-be-) addition to the roster.

Smoky Mountain Model Works recently (April 2018) released their "return to O scale" kit for an AAR 53' 6" 70t flat car.   I heard many good things about their kits in general and from those who built this kit since its release.

Alas, I wasn't fully sold on it until finally (!) completing enough research to prove that this car type would've been active in my target era of mid-1970s to early-1980s.  Using a recently-re-discovered digital release of Vintage Freight Cars from Morning Sun Books, I found a 1973 picture of Penn Central 751355 as shown below:

I was then able to track the car series through my hardcopies of the Official Railway Equipment Registers like so:

ClassSeries
FMS751300-751383

WhenWhoHow Many
UnknownNew York CentralUnknown
Apr 1973Penn Central1+
Jul 1975Penn Central30
Oct 1977Conrail (PC)9
Jul 1978Conrail (CR)7
Apr 1979Conrail (CR)6
Oct 1982Conrail (CR)3

So, armed with this new information and previous research on customers and commodities showing that U. S. Engineering could be a customer of coiled steel, I ordered one of the car kits.   Stay tuned for future updates when (?) I get around to building either it or anywhere to operate it.

Tuesday, March 21, 2017

The "rustults" are in!

**Updated**

I mentioned in my previous post that I was going to try creating prototypical rust on steel model rails.  After a dunk in a saltwater, vinegar, and hydrogen peroxide bath, the results -- er, should I say "rustults" -- are in.   I primarily used the method documented at this link, specifically the ratio of "4 parts white vinegar, 1 part hydrogen peroxide (3%) and 1/2 part of salt" found in the comments section.

See for yourself:
The rust is real, folks...but...maybe...it's a little too real.

Critiques on Day 1:
  • Inconsistent application: Perhaps this is because it's been only a day and they are not continuously exposed to the conditions to keep rusting.
  • Inconsistent coloring: The foreground piece is mostly black or grey, while the two pieces in the back are very, very orange.
  • Too orange: The hobby industry says paint your track "rail brown", not "rail orange"...
  • Fragile: Too much handling and the rust comes right off.  It could make a nice weathering powder though...   To be fair, the same happens to real rails; that's why the top surface is shiny after use.
For comparison, here are some shots of the prototype track:
If there are any readers who'd like to comment, I'd be interested in your thoughts.

Updates on Day 14:

  • I think if I hit them with the salt solution again, the rusting would continue and perhaps sink in a bit.  At least once source I read said to go back with a soft toothbrush to knock down the loose stuff and then repeat until satisfied.
  • After several days, it seems less fragile
  • It isn't any less orange
  • The rails smell like vinegar, perhaps need to tone that down in the mix
Other sources pointed to nitric acid but also said that that's a pretty harsh chemical and I've not yet looked for a supplier of that.

Saturday, March 18, 2017

I have returned!

There's a distinct risk that a low-traffic'd blog would lose its whole readership when 9 months elapses between posts but hopefully my reactivated progress and some new posts will start to reverse this.

I just returned from a visit to the 2017 "March Meet" in Chicago, IL where several new rolling stock acquisitions were made.  See the updated Equipment Roster page for the latest updates.

I also acquired a few other smaller items like real limestone loads for delivery to Carthage Marble and the first turnout parts from American Switch & Signal.

While no actual layout construction has begun, I'm embarking on an experiment to try to accelerate the rusting of real steel rail (code 125 as discussed earlier); we shall see what results develop with that.

Hopefully this will mark the start of some more regular postings!

Equipment Roster

*Updated 07 April 2017 -- Added a few more cars; I think the roster is looking pretty solid now.
*Updated 18 March 2017 -- Mass update with acquisitions through this date
*Updated 19 July 2015 -- Moved some cars to individual pages.

With my recent visit to the Chicago March Meet O Scale Show and this post, the conversion to P:48 (O Scale) is fully on!  The roster of equipment is up to five boxcars, mainly because that's the most prevalent car type serving industries on the spur and one can never have enough boxcars.

Each of these will be a project in and of itself.  First is conversion it from standard O scale (using a 5' wheel spacing) to P:48 which uses the 1/4" to 1' scale and honors the prototype's 4' 8 1/2" wheel spacing and second is enhancing some of the details with replacement (Protocraft) couplers, wire grab irons, etc.

I'll try to structure this page with a photo of the model plus either or both prototype information and photos.

As is often the case with model freight cars, the manufacturers take several liberties with selectio of car numbers, application of paint schemes.  I wouldn't be surprised if I had to perform some renumbering along with the detail work.

Research on these cars is incomplete.  I give a fair amount of credit to RailcarPhotos.com for reference material.  Of course, this is only one of many sources and I'll be most grateful to any reader out there able to deliver additional research bits on these cars or the accuracy of the models themselves.

I need to dig out my ORERs from storage a see what else I can learn.

An additional research site that I recently found is: Eric's Railroad Car History

(Larger pictures can be viewed by clicking the reporting mark text links)

GB&W 7080

Conversion work has started on this freight car, see details on the GBW 7080 page.

IC 150022

This car is a 53' double plug door boxcar manufactured in 1971 (according to the printed car data) by the Evans Products company.  I (yet) wasn't able to find an exact prototype photo, but did locate one of a similar car lettered for the Frisco.   I also found several examples validating the paint scheme in the mid-to-late 1970s era.

RI 33821


According to the model lettering and box description, this is a 60' car intended for automotive service (stenciled return to Flint, Mich).  Having found this picture of a 50' car in the exact same scheme, I'm skeptical about the correctness.  According to the printed car data, it was manufactured in Nov. 1966 by the ...

L&N 100161


The manufacturer lists this as a 50' PS-1 boxcar and my (limited) research to date indicates that it is likely a stretched rebuild of a 40' PS-1 (Pullman-Standard) box car.  I found two examples of really good visual matches, albeit with different lettering schemes, doors and car numbers.

MP 265032


I don't have much on this car yet.  One search to date reveals many 60' MP boxcars, but none in this number series or door configuration.  A more refined search of "ex CEI" cars yields similar results.

ATSF 310137

Atlas PS-2 airslide intended for flour deliver to Safeway Bakery

DRGW 18109

Atlas PS-2 airslide intended for flour deliver to Safeway Bakery

BN 281430

Modernized 40ft boxcar for general deliveries to warehouses at the end of the line.

CB&Q 19861

Modernized 40ft boxcar for general deliveries to warehouses at the end of the line.

BN 875007

~17k gal tank car for chemical or oil deliveries

WRNX 14661

~17k gal tank car for chemical or oil deliveries.  This one likely has inaccurate stenciling, claiming to be built in April of 1958.

GM&O 59226

Atlas PS-1 box car for general deliveries

GN 72789

52'6" gondola intended for either line pole or wire spool deliveries to Southwestern Bell Telephone

LRLX 200

Specifically assigned 50' plug door box car for Masonite delivery to Schutte Lumber

SHPX 60905

Three bay cylindrical hopper car for plastics.   I might be able to use this if Styro Fabricators is modeled.

SOO 6748

50' box car for general deliveries to warehouses at the end of the line.  This is a older Weaver model and I'm presently unsure how it stacks up against the newer Atlas offerings.

SOO 18929

Atlas PS-2 airslide intended for flour deliver to Safeway Bakery.  This is a older Weaver model and I'm presently unsure how it stacks up against the newer Atlas offerings.

Undec 50' Flat Car

Currently undecorated Overland models brass 50' flatcar that will eventually find its way into either lumber service for Schutte Lunber or other deliveries to Swenson Construction.

BN 281430 (#2)

A second copy of the one featured earlier on this page.  Will need to rennumber

UP 518250

Another Atlas trainman 40' box.  This one came weathered to boot!
Tuesday, July 19, 2016

Christmas In July

Again, there's nothing to report on the modeling progress front...The three-month-old mentioned in April's post is now six-months-old and other projects have dominated free time.   However, P:48, I have not forgotten thee!

This was reinforced when a package arrived at my doorstep.


A look inside the box reveals a great starting point for conversion into era appropriate motive power that was first discussed in a post from June 2014.


As the box said and the pilots/couplers tell you, it is three-rail OW5, but the package came with replacement pilots and the rest (couplers & trucks) would've already been replaced anyway.

By the way, my birthday is in July.  :-)   Thanks, bro.

Sunday, April 17, 2016

P:48 Possibilities Come Alive

Nothing to share on my own efforts unfortunately due to time constraints...three-month-olds have a habit of doing that...but something cool to share from the greater Proto:48 community.

Way back in Dec 2014, I mused about some neat things that attracted me to this scale and one of those was working brakes on the freight cars to add an additional aspect to the recreated operations.

A modeler by the name of Jamie who's on the Yahoo Proto48 group just shared a short video of a working brake mechanism on a P:48 truck.  Pretty neat!

Sunday, January 17, 2016

Track Laying Begins


My afore-promised late-December posting never materialized, mainly due to the holidays, a modeling side project in HO scale (chain link fence) and the arrival of a new child in our family.   However, I did make some progress lately on laying down rail on the test track that I'll share here now.

 I'm happy with the results thus far...The tie plates make a huge difference and the spike heads are not obtrusive.  A few comments on each of those:

After testing both tie plates, the first from Jim Lincoln's Shapeways offerings and those from Monster Model Works, I found that I prefer the ones from MMW.  The Shapeways ones look fine but are made from a brittle plastic that broke a few times while I was inserting it under some already spiked rail.

Speaking of spiking, I'm trying out the scale spikes from Proto:87 stores.  Now, you're probably confused since this is a Proto:48 project, but they offer some longer and slightly larger ones that work for this scale too.  For the first go-round, I picked the 0.120" long spikes.   Let me tell you...They're tough to get off the frets and into pliers.   The big disappointment here was they're too short to work well with the MicroMark spiking pliers (although the flat part below the groove on these pliers does work reasonably well for holding the spikes).  I just recently ordered some of the 0.180" long ones, so hopefully they'll be easier to drive.  Regardless, at four spikes per tie, handlaying track this way is going to take a long time...


Joint bars (L-shaped, as observed on the prototype) were ordered from Bill Brillinger's Precision Design Company and I expect them here soon, so that'll be the next update along with finishing touches for weathering.


Friday, December 4, 2015

Color Is Everything

Finally got around to trying different approaches for coloring the ties.  I was going to post this almost two weeks ago when the painting was done, but decided that for a proper evaluation I also needed the contrast of the ballast.

The first three pictures are the ones I felt gave the best results:
First, Rustall #2 solution as suggested by Mike Cougill in his book,  Detailing Track
Second and third are a random combinations of Umber and Gray PanPastels plus a drop or two of India Ink turned into a wash with 91% ISO.  The darker ones are heaver on the gray PanPastel or India Ink and represent more recently replaced ties


For full disclosure, here are a few other options I tried:
First up is a spray paint approach using a Testor's Graphite Dust -- It ends up being too metallic looking
Next are some paint-pen trials, but despite being labeled brown, have far too much red in them

I think I'll stick with using the Rustall #2 as a base and then come in with some of the washes and randomly distribute a few darker ones to show some age variation.

I am pleased that the wood-grain distressing shows up nicely with this weathering method.

The ballast is an approximate 2/3, 1/6, 1/6 mix of medium, fine, and coarse sizes of Woodland Scenics Light Gray ballast.  Prototype photos below show varying sizes of rock, so I think mixing them while favoring the medium size provides that look.  If anything, I probably should up the contribution of the "fine" size.  In the future I might try some real rock products from, say, Arizona Rock and Mineral.


Look for a post later in December, hopefully with tie plates (from Jim Lincoln and Monster Model Works), rail and joint bars (still need to order those from Bill Brillinger's Precision Design Company!